
How to Set Up Main iPlum Number to Route Calls to Multiple Phones or Users
Choose the right way to route calls and share your main iPlum number with your team.
I. Phone Tree & Extensions — Includes Auto-attendant. Play a welcome greeting and let callers select extensions to reach team members or departments.
II. Shared Line (Recommended for Team Sharing) — Share calling, texting, voicemail, contacts and other supported services across the iPlum app and web portal.
III. Simple Call Forwarding — Use when forwarding incoming calls to external phone numbers without Shared Line features.
I: Route calls to multiple devices/users using phone tree and extensions.
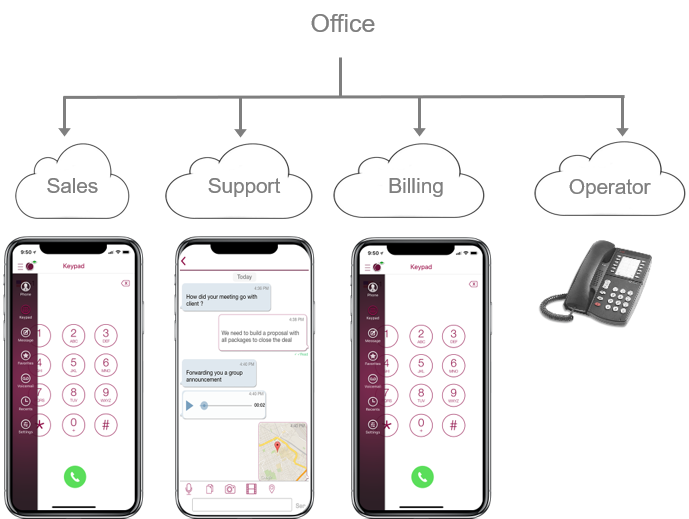
Summary:
- Setup a master account with main iPlum number and add users with local iPlum number subscription for each user.
- Users will install iPlum app on their devices and login with their distinct login IDs.
- Using this approach when a caller dials your main iPlum number they will hear your welcome phone tree greeting.
- They will be presented with option to dial extensions. One extension can ring one device or multiple devices.
- All users can make & receive calls simultaneously.
A. Phone tree setup for calling:
To avoid repetition, please check this tutorial for Phone tree setup
B. Sharing Texting, Voicemail, Contacts and Fax:
To create sharing for text, fax, business contacts & voicemail please check this FAQ: What is a shared user and how to setup?
II. Share Your Main iPlum Number Using Shared Line Feature
Shared Line is the recommended option when team members need access to the same business communications. Share calling, texting, voicemail, contacts and other supported services in both the iPlum app and web portal.
Summary:
Shared Line lets authorized team members access the same business line for calling, texting, voicemail, contacts and other enabled services. Administrators choose which users can access the shared line and review the available service permissions. Users can access supported shared-line features in both the iPlum app and web portal.
Steps:
1.
How to create additional users?
Login to your master account https://my.iplum.com/
Click Add User (Phone or Fax) in the USERS section.
Use the user's business email address as the Login ID when creating a new sub-account.
The user will get an invitation, which they will accept.
Buy the Professional or Enterprise subscription plan in this sub-account.
FAQ to setup additional lines: https://www.iplum.com/faq/invite-and-add-other-users#add2
2.
How to share numbers in your iPlum admin account:
Login https://my.iplum.com using administrator credentials.
Dashboard || Users || Click iPlum Login ID of the line to share || Settings || Share Line (Edit) ||Select other users to share this number. Review services & permissions.
Authorized users can access supported shared-line services in their iPlum app and web portal.
Note: Each user needs to have an active iPlum subscription (Professional or Enterprise) to use shared number feature .
FAQ for sharing number with other users https://iplum.com/faq/what-is-shared-number
III. Simple Call Forwarding to External Phone Numbers
Use Simple Call Forwarding only when you need to route incoming calls to external phone numbers. For team members who need calling, texting, voicemail and contacts on the same iPlum line, use Shared Line instead.
Summary:
Calling: Configure call forwarding on the primary iPlum number to send incoming calls to the required external destination numbers.
Important: Simple Call Forwarding routes calls only. It does not provide the shared calling, texting, voicemail and contacts experience available through Shared Line.
With Shared Line, authorized team members can access shared iPlum numbers for calling, texting, voicemail, contacts, fax and other supported services in both the iPlum mobile app and web portal. Administrators select the users and permissions for each shared line. The system can also track which user responded to a shared-line text.
Setup:
- Login https://my.iplum.com.
- Click Dashboard || Users || Add User (Phone or Fax).
Create a new sub-account using the user's business email address as the Login ID.
- The new user will receive an email invitation to accept. They will be prompted to setup a new password. You will be notified via your administrator email when the user accepts your invitation.
- Buy Plan:
Dashboard || Users || Click iPlum Login ID of the User || Get iPlum Plan . Follow the prompts to buy the plan on this sub-account. The system will allocate a new iPlum number.
- Call Forwarding on Primary Line:
Dashboard || Users || Click iPlum Login ID of the Primary Line || Settings || Call Forwarding (Edit) || Enable it || Enter the external destination phone numbers and save. You can enable additional options to choose if you want the primary voicemail if none of numbers answer the call. You can choose to Display Incoming Caller ID to be "Actual Calling Number" or "iPlum Number".
- Setup Voice Network Mode for best call reliability :
Dashboard || Users || Click iPlum Login ID of the User || Settings || Call Mode: Outgoing Calls (Edit) || Use My Voice Network || Enter the user's physical mobile phone number and save.
Dashboard || Users || Click iPlum Login ID of the User || Settings || Call Mode: Incoming Calls (Edit) || Use My Voice Network || Enter the user's physical mobile phone number and save.
Note: Voice network mode maintains iPlum Caller-ID for all iPlum calls.
Note: Each user needs to have an active iPlum subscription (Professional or Enterprise) to use shared number feature .
%20(1).avif)
.avif)